
Set up the ticket desk
- Lesson 1
- 40 min
- Module 1: Web foundations bridge
Lesson 1 of 19 · Frontend Architecture and Performance for AI AppsSet up the ticket desk
1. Web foundations bridge
2. Components and application structure
3. Data fetching and state management
4. AI-specific interaction states
5. Performance and scalability
6. Security, accessibility and handoff
What you will be able to do
Run Larkfield’s ticket API on your own computer and ask it for tickets, from a terminal and from a browser. Every later lesson of this course needs this API running, and the difference between “runs in the browser” and “runs on a server” starts here.
Before you startWhat to know and to have ready
What you need to know
- Requests, responses, status codes and JSON, from Build and Deploy Your First API. HTTP fundamentals and Inspect a request are enough.
- How to open a terminal and move between folders with
cd, from Python for Practical AI Engineering.
What you need on your computer
- A terminal, VS Code and a current browser: Chrome, Edge or Firefox.
- About 100 MB of free disk space for Node.js, and a connection to download it.
- No account, no key and no money.
You do not need to know HTML, CSS or JavaScript. This module teaches them from the start. Tested with Node.js 24.18.0 and npm 11.16.0 on macOS (Apple silicon), in Chromium. The Windows (PowerShell) and Linux commands are written for you, but the course team did not run them.
A restaurant: the table and the kitchen
Section titled “A restaurant: the table and the kitchen”Think of a restaurant. At your table, you have the menu, a glass and a pen. You can read everything on the table, move it, and even write on the menu. Nobody stops you, because the table is yours while you sit there.
The kitchen is different. It has the fridge, the recipes and the cash box. Guests do not go in. When you want food, you do not walk into the kitchen: you ask the waiter, and the kitchen decides what to send back.
A web application has the same two places. The browser is your table: the page, its text and its buttons are on your computer, and you can read and change all of them. The server is the kitchen: a program on another computer that keeps the data and decides what to answer. A request is the waiter’s trip between them.
Larkfield needs a screen
Section titled “Larkfield needs a screen”You know Larkfield’s help desk from Build and Deploy Your First API. Amira, the developer, owns the ticket API and its contract. The help-desk agents use that API today with curl and with the API’s documentation page.
Grace, the support lead, has had enough of that. “My agents need a real screen,” she says. “A list of tickets that stays fast with thousands of them. A ticket view that shows the AI draft while it is written, with a Stop button. Clear messages when the AI is slow or fails.”
Sam will build it, and you build it with them. Sam is new to the frontend: they wrote Python and an API, but never a web page. In this course, the frontend is the part of an application that runs in the browser. The backend is the part that runs on a server. Sam’s first question is a practical one: “What do I build against?”
The problem: the real API is not easy to borrow
Section titled “The problem: the real API is not easy to borrow”The real ticket API needs a database, Docker and an AI provider with a paid key. Sam could start all of that, but a screen needs something more. It must show what happens when the API is slow, when it fails, and when an AI draft stops in the middle. A real API does those things rarely, and never when you want to see them.
So Sam needs an API that answers like the real one. It must run on their own computer without money, and be slow or broken on purpose. That is a mock API: a stand-in program that answers the same requests, with the same paths, fields and errors. Only its data is made for practice.
The ticket API in this course is a mock on your computer. Its AI drafts were written by real models in earlier courses and are replayed; its slow, failing and interrupted answers are simulated.
| Part of the mock API | Real or made up |
|---|---|
| The paths, the fields and the error shape | The same as the ticket API’s contract |
| 10,000 tickets | Made up from the texts of earlier courses’ practice tickets |
69 AI drafts, their sources and their needs_human flags |
Real: written by a model in Building Reliable Applications with LLM APIs, replayed |
| How long each draft took (median 2,774 ms) | Real: the recorded time of each call |
| Slow lists, failures, interrupted drafts | Simulated on purpose, when you ask for them |
One ticket is a practice ticket: T-80010, from “Test Customer”, the newest one in the list. A later lesson on browser security uses its draft. You see it first in every list, so do not be surprised.
Two places where code runs
Section titled “Two places where code runs”The mock API is a program written in JavaScript, the language that browsers run. But this program does not run in a browser. It runs with Node.js: a program that runs JavaScript on a computer, outside any browser, as python runs Python. So the same language runs in two places: in the browser, and on a server.
In this course, the server is your own computer. Your computer has the address 127.0.0.1, which always means “this computer”. The mock API listens on port 8100, so its full address is http://127.0.0.1:8100. The port tells your computer which program gets a request, as you saw in Browser-to-server basics.

Text description of the diagram
Your computer runs three programs in this lesson. In terminal 1, Node.js runs the mock ticket API, a server at http://127.0.0.1:8100. In terminal 2, curl asks it for two tickets. In the browser, you ask it for three tickets. Both clients send a request, and the server answers each one with JSON. The server never starts a conversation: it waits for requests.
So “where does this code run?” has a clear answer for every file in this course. The files in mock-api/ run on the server, with Node.js. The files that you write in the next lessons run in the browser, on the agent’s computer. There, the agent can read and change them. Keep that in mind: later, it decides where a secret may go.
Install Node.js
Section titled “Install Node.js”Node.js has two kinds of version. An LTS version (long-term support) gets fixes for about three years. A “Current” version gets new features first. This course uses Node.js 24 (LTS). Node.js comes with npm, its package manager, which you meet in Browser and build tools.
-
Check whether you already have it. In a terminal, run:
Terminal window node --versionIf it prints
v24.15.0or a laterv24, skip to the next section. If it printscommand not found, or a lower number, continue. -
Install Node.js 24 (LTS):
Open nodejs.org/en/download, choose the LTS version and the macOS Installer (.pkg), and run the installer. If you use Homebrew,
brew install node@24also works; then follow the lines that it prints to add Node.js to your path.Open nodejs.org/en/download, choose the LTS version and the Windows Installer (.msi), and run the installer. Keep the default options. Or, in PowerShell:
winget install OpenJS.NodeJS.LTS.Use the instructions for your distribution on nodejs.org/en/download, for example with nvm. The packages of many distributions are too old for this course.
-
Close the terminal, and open a new one. A terminal reads the list of programs only when it starts.
-
Check both programs:
Terminal window node --versionnpm --versionThe author’s computer printed this. A later 24.x version is fine:
v24.18.011.16.0
Get the project
Section titled “Get the project”The course keeps its project files in the labs repository, in snapshots. A snapshot is the project folder as it is at one point of the course. You start from start: it has only the mock API.
-
Get the files of the course. If you have Git, clone the labs repository once, in
~/projects(make the folder withmkdir -p ~/projectsif it does not exist). If you have the clone already, rungit -C nextia-learning-labs pullinstead.Terminal window cd ~/projectsgit clone https://github.com/Nextia-Intelligence/nextia-learning-labs.gitWithout Git, download the ZIP file of the repository, and unzip it in
~/projects. Its folder is thennextia-learning-labs-main. Use that name in the next step. -
Copy the snapshot
startto a new folderticket-desk:Terminal window cp -R nextia-learning-labs/C22/snapshots/start ticket-deskcd ticket-deskTerminal window Copy-Item -Recurse nextia-learning-labs\C22\snapshots\start ticket-deskcd ticket-desk -
Open the folder in VS Code: File › Open Folder…, then
ticket-desk. The folder has these files:ticket-desk/├── README.md├── LICENSE└── mock-api/├── server.mjs the mock API: its paths and answers├── store.mjs the tickets and the drafts in memory├── server.test.mjs 21 checks of the mock API└── data/ tickets.json, drafts.json, timing.jsonA
.mjsfile is a JavaScript file in the modern module format. JavaScript essentials explains modules.
Start the mock API
Section titled “Start the mock API”The mock API is a server, so it keeps running and waits for requests. Give it its own terminal.
-
In VS Code, open a terminal: Terminal › New Terminal. This is terminal 1. Check that it is in the
ticket-deskfolder. -
Start the mock API:
Terminal window node mock-api/server.mjsIt prints two lines, and then it waits:
Mock ticket API on http://127.0.0.1:8100 (large: 10000 tickets; list=normal stream=recorded jobs=normal writes=normal)AI drafts are recorded answers from earlier courses; slow and failing answers are simulated. -
Leave terminal 1 open. The API stops when you close it.
Read the first line from the left. The address is the one from the diagram. large: 10000 tickets is the size of the data. The four words after it are the modes: now the list, the draft stream, the background jobs and the changes all behave normally. Later lessons start the API with other modes, for example --list slow, to see a slow answer on purpose.
Ask it questions with curl
Section titled “Ask it questions with curl”Now be the client. Open a second terminal with the + button of the terminal panel. This is terminal 2.
On Windows, type curl.exe instead of curl in every command of this course. In Windows PowerShell, curl alone is a different command with other options.
-
Ask whether the API is alive:
Terminal window curl http://127.0.0.1:8100/health{"status":"ok"} -
Ask for the two newest tickets. Keep the quotes: the
?in the address means something to some terminals.Terminal window curl "http://127.0.0.1:8100/v1/tickets?limit=2"The answer is one long line. Here it is with line breaks added, so that you can read it:
{"items":[{"ticket_id":"T-80010","customer_id":"C-0041","customer_name":"Test Customer","subject":"Return label for my order LK-300210","team":"other","priority":2,"status":"open","created_at":"2026-10-10T18:30:00Z","message_count":0,"last_message_at":null},{"ticket_id":"T-80009","customer_id":"C-88930","customer_name":"Uma Roy","subject":"My order LK-55190 never arrived","team":"shipping","priority":2,"status":"open","created_at":"2026-10-10T17:21:00Z","message_count":0,"last_message_at":null}],"next":"MjAyNi0xMC0xMFQxNzoyMTowMFp8VC04MDAwOQ"} -
Ask for a ticket that does not exist:
Terminal window curl http://127.0.0.1:8100/v1/tickets/T-99999{"error":{"code":"not_found","message":"There is no ticket T-99999.","request_id":"581024a4-02f7-43c4-a3e3-af20e3588df0","fields":[]}}Your
request_idis different: the API makes a new one for each request. -
Look at terminal 1. The API wrote one line for each request:
GET /health 200 4 msGET /v1/tickets?limit=2 200 62 msGET /v1/tickets/T-99999 404 0 ms
Each answer has a shape that you know from the API course. The list has items, the newest ticket first, and next. next is a cursor: a bookmark that you send back to get the following page. In Module 3, the desk uses it to page through the 10,000 tickets, 50 at a time. The error has the same shape as every error of the ticket API. It has a code for programs and a message for people. Its request_id finds the request in a log, and fields names the wrong fields.
The log shows the time that each answer took. A list takes about 60 ms because the mock waits on purpose: 60 ms, plus 0.1 ms for each ticket that matches a search. That time is simulated, so that a slow search is easy to see later.
Ask it from the browser
Section titled “Ask it from the browser”A browser is a client too. When you type an address and press Enter, the browser sends a GET request, as curl does.
Open http://127.0.0.1:8100/v1/tickets?limit=3 in your browser.
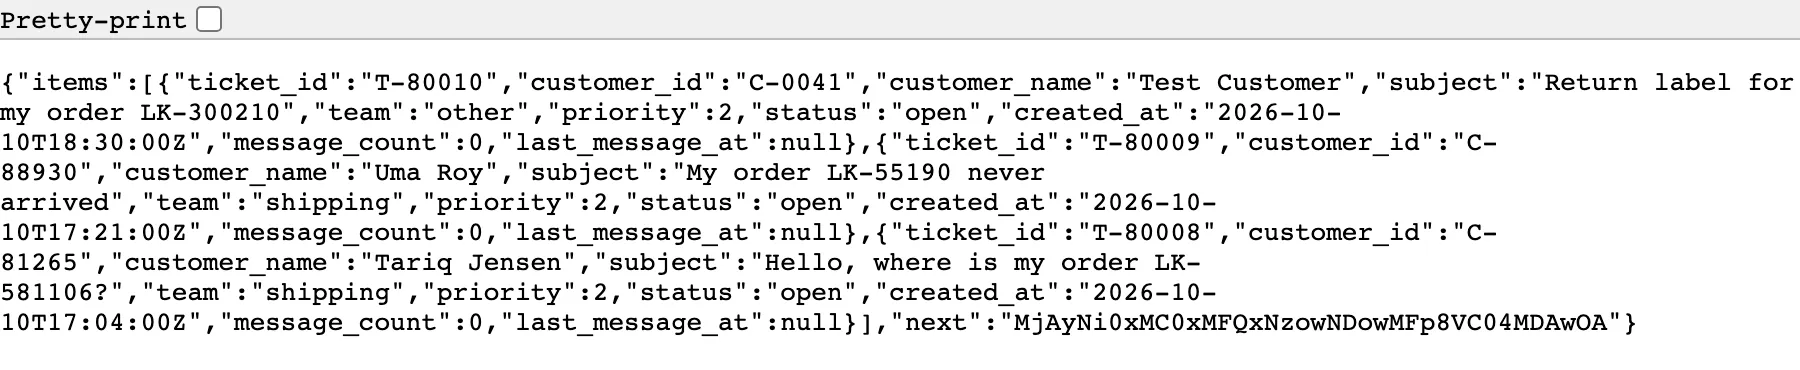
Terminal 1 logs GET /v1/tickets?limit=3 200 64 ms. The browser shows the data, but it does not make a screen from it: there is no list, no button and no colour. Making that screen is the job of the frontend, and the next three lessons build it with HTML, CSS and JavaScript.
Now open http://127.0.0.1:8100/. The API answers with a short JSON message, {"name":"Mock ticket API","try":[…]}, that names three paths to try. In HTML and CSS essentials, this address shows your first page instead.
Check that everything works
Section titled “Check that everything works”The snapshot comes with checks for the mock API. Run them in terminal 2, in the ticket-desk folder. Terminal 1 can keep running, because the checks start their own copies of the API on free ports.
node --test mock-api/server.test.mjsThe output lists each check and ends with this summary. The times differ on every run:
✔ the large data has 10,000 tickets and is the same every time (18.975666ms)✔ pieces of a reply join back to the reply (1.505666ms)ℹ tests 21ℹ suites 0ℹ pass 21ℹ fail 0ℹ cancelled 0ℹ skipped 0ℹ todo 0ℹ duration_ms 233.05483321 checks pass: your setup is correct. If a check fails, copy the snapshot start again, and repeat the steps.
Stop and reset. To stop the API, select terminal 1 and press Ctrl+C. The mock keeps every change in memory only, so it forgets new tickets and messages when it stops. That is its reset: start it again, and the data is as new.
When to use a mock API, and what it costs
Section titled “When to use a mock API, and what it costs”Use a mock API while you build a screen. It answers at once, costs nothing, and can fail on purpose. Use it also when the real backend is not ready yet, if both teams agree on the contract first. Amira’s contract is that agreement: the paths, the fields and the error shape.
Do not use a mock to measure the real API’s speed, or to judge the AI’s answers. The mock’s list times are simulated, and its drafts are recordings: they never change, even when a real model would.
A mock also has a cost. Someone must keep it the same as the contract. If Amira adds a field and nobody adds it to the mock, the screen works on Sam’s computer and breaks with the real API. In a real team, a test against the contract checks both sides.
Common mistakes
Section titled “Common mistakes”Common mistake
The port is already in use: EADDRINUSE
Symptom: you start the API, and Node.js stops at once with a long error:
Error: listen EADDRINUSE: address already in use 127.0.0.1:8100 at Server.setupListenHandle [as _listen2] (node:net:2009:16) ... code: 'EADDRINUSE', errno: -48, syscall: 'listen', address: '127.0.0.1', port: 8100}Cause: another program already listens on port 8100. Usually, it is the mock API itself, still running in another terminal. Only one program can listen on a port.
Fix: find the terminal that runs it, and use that one. Or stop it there with Ctrl+C, and start it again. If a different program uses the port, start the mock on another one: node mock-api/server.mjs --port 8101. Then use 8101 in your requests.
Common mistake
curl cannot connect
Symptom: curl answers at once with:
curl: (7) Failed to connect to 127.0.0.1 port 8101 after 0 ms: Couldn't connect to serverCause: no program listens on that port. The API is not running, it stopped with an error, or the port in the address is wrong. Here, the port was 8101 instead of 8100.
Diagnose: look at terminal 1. If it shows a prompt instead of the two start lines, the API is not running.
Fix: start the API again in terminal 1, and check the port in your command. A browser shows the same problem as “This site can’t be reached” or “Unable to connect”.
Already a web developer?
Section titled “Already a web developer?”This module teaches HTML, CSS, JavaScript, npm and TypeScript from the start. If you already build web interfaces with JavaScript, you can skip it. Try the entry task first, without help, in about 30 minutes:
- With the mock API running, make one HTML page with a form (customer ID, subject, message). It sends
POST /v1/ticketswithfetch, and shows the new ticket’s ID, or the API’s error message in words. - Explain in two or three sentences which code of your page runs in the browser, which code must run on a server, and why.
If you can do both, copy the snapshot end-of-m01 instead of start, as the snapshots page explains. Then continue with React basics. The guided practice at the end of Browser and build tools has a worked solution.
Case studies in this course
At the end of the course, you use what you learn on a realistic project, from the data to the recommendation. Complete at least one for the certificate; the others are optional.
- Fast search over a public datasetBuild a search interface over an open dataset with server paging, stale-response handling and virtualization, and measure it.
- Make an AI chat interface accessibleMake a chat interface usable by keyboard and screen reader: focus, labels and announcements that do not read every token, tested with the browser's accessibility tree.
Knowledge check
Section titled “Knowledge check”Check your understanding
The mock API and the pages that you write later are both JavaScript. Where does each one run, and what program runs it?
Show the answer
The mock API runs on a server, with Node.js: in this course the server is your own computer, in terminal 1. The pages that you write run in the browser, on the computer of the person who opens them, and the browser runs their JavaScript. The language is the same; the place is different. The person at the browser can read and change everything that runs there, as a guest can write on the menu.
Does your answer have the main points of ours?
Sign in and enroll in the course to save your answers. Every check counts toward the certificate.
Check your understanding
Predict: you stop the mock API with Ctrl+C, and then open http://127.0.0.1:8100/health in the browser. What do you see, and what does terminal 1 log?
Show the answer
The browser cannot connect, because no program listens on port 8100. It shows an error page such as “This site can’t be reached” (the words depend on the browser). Terminal 1 logs nothing: the API is not running, so it never receives the request. curl shows the same problem as curl: (7) Failed to connect. Start the API again, and the same address answers {"status":"ok"}.
Does your answer have the main points of ours?
Sign in and enroll in the course to save your answers. Every check counts toward the certificate.
Check your understanding
Which parts of the mock API are real recordings, and which are made up or simulated? Name one thing that the mock cannot tell you.
Show the answer
Real: the 69 AI drafts, with their sources and their needs_human flags, and the time each draft took (median 2,774 ms). The paths, fields and error shape follow the real contract. Made up or simulated: the 10,000 tickets, the list’s server time (60 ms plus 0.1 ms per match) and every special mode. The mock cannot tell you how fast the real API is. It cannot tell you how good a new model’s drafts would be either: its answers never change.
Does your answer have the main points of ours?
Sign in and enroll in the course to save your answers. Every check counts toward the certificate.
Recap
- A web application has two places where code runs. The browser is the user’s table: they can read and change everything on it. The server is the kitchen: it keeps the data and decides what to answer.
- Node.js runs JavaScript outside the browser. The course’s mock ticket API is such a program. It runs on your computer at
http://127.0.0.1:8100, with 10,000 made-up tickets and 69 recorded AI drafts. curland the browser are both clients: they send requests, and the server answers. The answers have the ticket API’s shapes: a page ofitemswith anextcursor, and one error shape.node --test mock-api/server.test.mjschecks your setup (21 pass). Ctrl+C stops the API, and a new start resets its data.
Next, you write the first page of the ticket desk with HTML and CSS, and the mock API serves it at http://127.0.0.1:8100/.
Next: HTML and CSS essentials