
OAuth and OIDC
- Lesson 4
- 50 min
- Module 2: Understand login and tokens
Lesson 4 of 19 · Authentication, Permissions and Multi-Tenant ApplicationsOAuth and OIDC
1. Identity and permission basics
2. Understand login and tokens
3. Sessions and application integration
4. Enforce resource access
5. Background work and administration
6. Validate and document the design
What you will be able to do
Let a separate service check who a person is, so that the ticket API never sees a password. Learn the two standards behind it: OAuth for access to an API, and OpenID Connect for sign-in. Then run the course’s practice identity provider.
Before you startWhat to know and to have ready
What you need to know
- The three questions of every request (who, what, in which organization), from Three separate questions.
- Users, organizations and memberships, from Users and organizations.
- The five made-up attempts that the shared API key cannot stop, from Threat examples.
What you need on your computer
- The project after Module 1, in
~/projects/ticket-api:python -m pytestprints154 passed. - PostgreSQL and Azurite running, with the data of both shops loaded (
python -m scripts.load). - The labs repository next to the project, in
~/projects/nextia-learning-labs. Rungit pullin it to get the latest snapshots.
This lesson adds the folder idp/ and one Python package. You need no account and no money: the identity provider runs on your computer, and every person in it is made up. Tested on macOS (Apple silicon); the Windows commands are written but not tested.
A hotel key card
Section titled “A hotel key card”You arrive at a hotel. At the reception desk, you show your passport once. The receptionist checks it and gives you a plastic key card. The card opens room 214 and the gym. It does not open the other rooms, and it stops working when you check out.
The door of room 214 never sees your passport. It only checks the card: is it a card from this hotel, is it for this door, and is it still valid? If you lose the card, the hotel gives you a new one, and your passport stays safe.
Three things make this work. One place checks who you are. It gives you something small and limited. Every door checks that small thing, not your identity papers.
The problem: a key that says nothing, and passwords everywhere
Section titled “The problem: a key that says nothing, and passwords everywhere”In Module 1, the ticket API had one shared API key. Every request looked the same, so the API could not tell Sam from Ines. The made-up attempts in Threat examples ended like this:
5 of 5 attempts got what they should not get.The obvious fix is a sign-in form in the API: ask each person for a password, and check it. Kwame, the solution architect, lists what that costs before anyone writes it:
- The API must store a password hash for every person of both shops. A leak of that table is a leak of every account.
- The API must build password resets, a second factor, a lock after many wrong tries, and email checks. Each one is a security feature that is easy to get wrong.
- Every application that calls the API must ask for the password: the help-desk page, a command-line tool, a future phone app. Each of them sees the password, and each of them can leak it.
- Bramble Books already has its own staff accounts. Its owner, Ines, does not want a second password for one more tool.
“Our API must answer three questions about every request,” Kwame says. “It should not be in the password business at all.”
The idea: an identity provider, and tokens
Section titled “The idea: an identity provider, and tokens”An identity provider is the hotel reception. It is a separate service with one job: to check who a person is. It can use a password, a second factor, or the shop’s own staff account. After the check, it gives the application a token. A token is a short piece of text that says who signed in, for which API, and until when. The API checks the token, never the password.
Two open standards describe how this works. Your API, the provider and the applications all follow them, so you can change the provider later without changing the API.
OAuth 2.0 is a standard for delegated authorization. “Delegated” means that a person lets an application act for them, with limits. The application gets an access token: the key card. The access token is for one API, for a short time, and for a limited set of actions. The name of the API in the token is its audience. The limited actions are its scopes, for example tickets:read. OAuth itself does not say who the person is. It says what the application may do at the API.
OpenID Connect (OIDC) is a thin layer on top of OAuth that adds sign-in. With OIDC, the provider also gives the application an ID token. It tells the application who signed in, for example “this is usr-sam, signed in at 06:10”. The ID token is for the application, not for the API. The name comes from OpenID, an older sign-in standard, now “connected” to OAuth.
So each token has one reader. The ID token is a note to the application: “this is who signed in”. The access token is a key card for the API: “this application may read tickets for this person”. Token meaning shows why sending the wrong one to the API is a real mistake.
Here are the hotel words and the OAuth words side by side:
| At the hotel | In OAuth and OIDC | In this course |
|---|---|---|
| Reception checks your passport | The identity provider authenticates the person | The practice provider at http://localhost:8400 |
| You, the guest | The person (OAuth calls it the resource owner) | Sam, Ines, Camille… |
| The booking app on your phone | The application (OAuth calls it the client) | The help-desk page, a command-line tool |
| The key card | The access token | A signed token for ticket-api |
| “Room 214 and the gym” | The audience and the scopes | ticket-api; tickets:read tickets:write |
| The check-in slip with your name | The ID token | A signed token for the application |
| The door | The API (OAuth calls it the resource server) | ticket-api |

Text description of the diagram
Read the numbers in order. Only arrow 1 carries a password, and it goes to the identity provider, never to the application or the API. Arrow 2 carries two tokens with two different readers. Arrow 3 is what the API receives on every request: the access token, in the Authorization header after the word Bearer. Arrow 4 is the only link between the API and the provider: the API fetches public keys to check the tokens.
“But if the API never sees the password,” Amira asks, “how does it know that a token is not made up?” The provider signs every token with a key that only it has. The API checks the signature with the provider’s published key. That is the subject of Read a token. For now, trust the card because the hotel made it.
A tiny example: what a provider publishes
Section titled “A tiny example: what a provider publishes”Every OIDC provider publishes a small JSON document at a fixed address: /.well-known/openid-configuration. It is called the discovery document, because an application discovers everything else from it. Here is part of the practice provider’s document:
{ "issuer": "http://localhost:8400", "authorization_endpoint": "http://localhost:8400/authorize", "token_endpoint": "http://localhost:8400/token", "jwks_uri": "http://localhost:8400/jwks.json", "grant_types_supported": ["authorization_code", "refresh_token", "client_credentials"], "code_challenge_methods_supported": ["S256"], "scopes_supported": ["openid", "profile", "email", "offline_access", "tickets:read", "tickets:write", "members:manage"]}Each line answers one question that an application or an API asks:
issueris the provider’s name. Every token it signs carries this name, and the API accepts tokens from this issuer only.authorization_endpointis the sign-in page: the reception desk. The browser goes there.token_endpointis where an application swaps a one-time code for tokens. Application flows uses it.jwks_uriis where the public keys are. The API reads them to check signatures.scopes_supportedlists what an application may ask for.openidmeans “I want an ID token too”: that one word turns OAuth into OIDC. The last three are the ticket API’s own scopes.
A real provider, such as Keycloak or Microsoft Entra ID, publishes the same document with its own addresses. That is why the API needs one main setting to find a provider: its issuer.
Larkfield: run the practice identity provider
Section titled “Larkfield: run the practice identity provider”The project has a small identity provider for practice in idp/, about 400 lines of FastAPI. It is a mock: its sign-in page lists the made-up people and asks for no password. Everything after the sign-in follows the standards: the discovery document, the keys, the codes and the signed tokens. The signing uses PyJWT and the cryptography package, two maintained libraries. The provider has no hand-written cryptography.
Two decisions shape the tokens of this course. First, the scopes: tickets:read, tickets:write and members:manage. A reporting script can ask for tickets:read only. Second, the token carries no organization and no role. Camille is staff at Larkfield and read-only at Bramble Books. If their token said “staff”, the API would believe it in both shops. So the API reads the organization from the request path and the role from its own membership table. Module 4 builds that check.
-
In
~/projects/ticket-api, with the virtual environment active, copy the provider and the new requirement files from the snapshotend-of-m02:Terminal window S=../nextia-learning-labs/C23/snapshots/end-of-m02cp -R "$S/idp" idpfor f in requirements.txt requirements-run.txt requirements-lock.txt .gitignore; do cp "$S/$f" "$f"; doneTerminal window $S = "..\nextia-learning-labs\C23\snapshots\end-of-m02"Copy-Item -Recurse "$S\idp" idpforeach ($f in 'requirements.txt', 'requirements-run.txt', 'requirements-lock.txt', '.gitignore') { Copy-Item "$S\$f" $f }The requirement files add one package,
PyJWT[crypto]==2.15.1(MIT licence). The.gitignorefile adds.idp/and.tokens/: two folders with secrets that Git must never see. -
Install the new package:
Terminal window python -m pip install -r requirements.txtExpect
Successfully installed PyJWT-2.15.1near the end. -
Set up the provider. This command makes a signing key and the secrets of two applications:
Terminal window python -m idp initMade a signing key (My9O_SxNpIg4Ff10) and the clients in /Users/you/projects/ticket-api/.idp.Wrote the client secrets of help-desk-web and export-worker to /Users/you/projects/ticket-api/.env.Wrote a new SESSION_KEY (the API encrypts its sessions' tokens with it).The provider keeps only their SHA-256. Never commit .env or .idp/.Your key ID in brackets is different:
initmakes a new key on every computer. The folder names are yours too. -
Start the provider. It runs until you stop it, so keep this terminal open:
Terminal window python -m idpPractice identity provider: http://localhost:8400 (made-up people, no passwords) -
Open a second terminal, go to the project folder and activate the virtual environment. Ask the provider for its discovery document:
Terminal window curl -s http://localhost:8400/.well-known/openid-configuration | python -m json.toolTerminal window curl.exe -s http://localhost:8400/.well-known/openid-configuration | python -m json.toolCompare it with the tiny example above. It also has
userinfo_endpoint,revocation_endpointandend_session_endpoint, which Module 3 uses. -
List the made-up people:
Terminal window python -m idp usersusr-grace Grace grace@larkfield.exampleusr-sam Sam sam@larkfield.exampleusr-omar Omar omar@larkfield.exampleusr-ines Ines ines@bramble.exampleusr-camille Camille camille@larkfield.exampleusr-tomas Tomás tomas@larkfield.exampleusr-kwame Kwame kwame@larkfield.exampleThe first column is the user ID that every token will carry. It is the same ID as in the
userstable of Module 1. -
Open the sign-in page in your browser. An application builds this address; for now, copy it:
http://localhost:8400/authorize?response_type=code&client_id=ticket-cli&redirect_uri=http%3A%2F%2F127.0.0.1%3A8765%2Fcallback&scope=openid%20tickets%3Aread&state=practice&code_challenge=LZsOqzOw8X64BP0LymcAokLEhiwPdKsXzgRUwiuBNM8&code_challenge_method=S256Look at the page, but do not pick a person yet. The next lesson explains every part of this address.
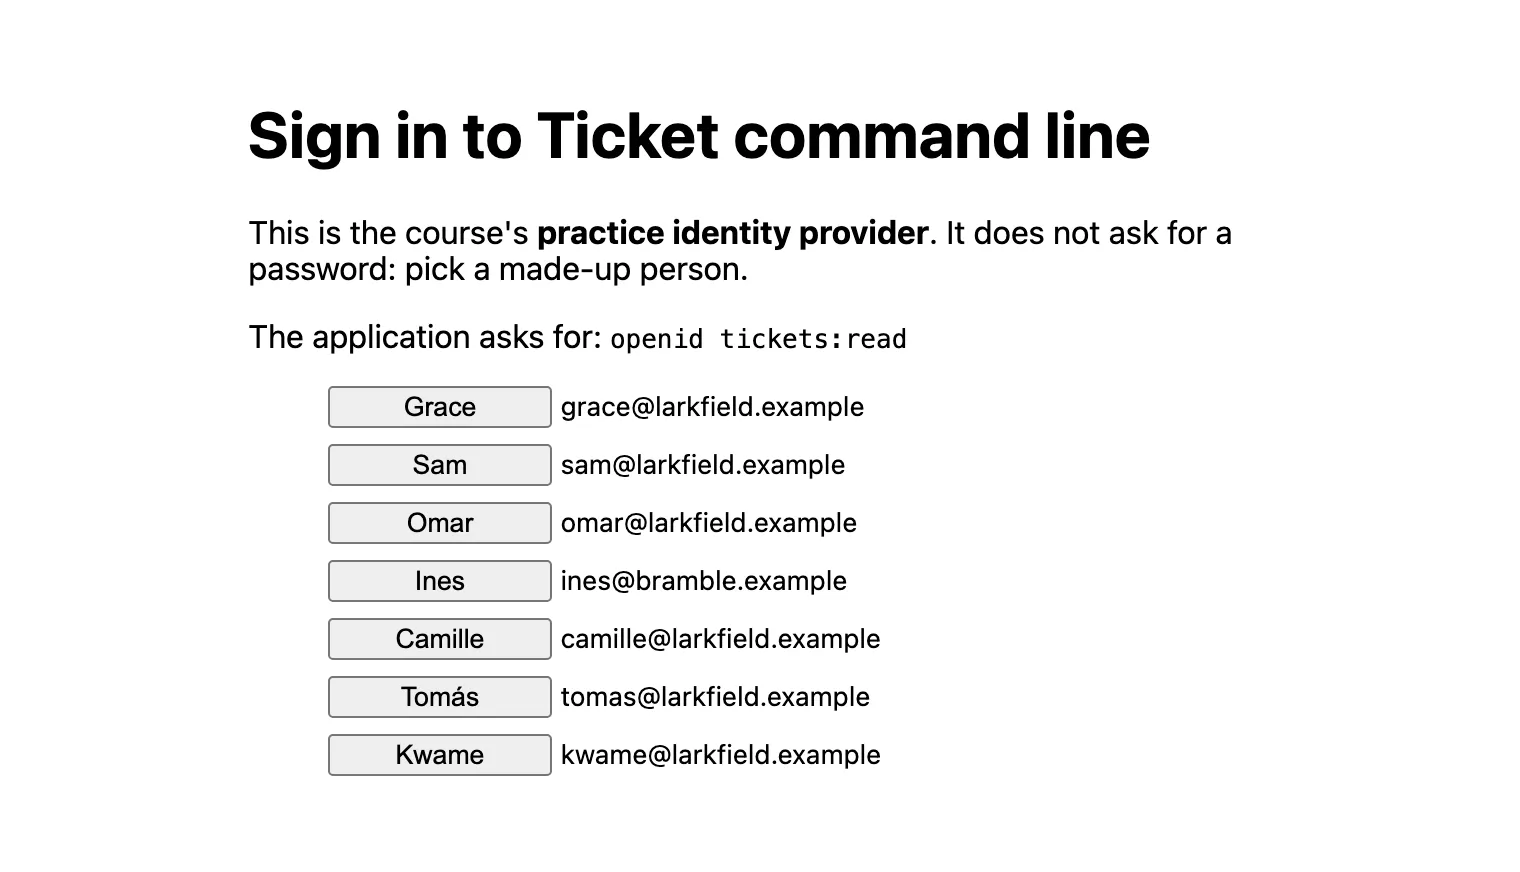
The page names the application (“Ticket command line”) and the scopes that it asks for. A real provider shows the same facts, and often asks the person to agree. This is the “delegated” part of OAuth: the person sees what the application will be able to do.
When to use an identity provider, when not, and what it costs
Section titled “When to use an identity provider, when not, and what it costs”Use an identity provider whenever people sign in to your API: staff, customers, or both. The provider does the hard and risky work once, for every application. A provider can also trust another provider, so Bramble’s staff could later sign in with their bookshop accounts. Module 3 connects the API to Keycloak, a free provider that runs in Docker, and reads the settings of Microsoft Entra ID.
You do not need one for a program that calls another program, with no person in the middle. The ticket API’s API key for /v1/classify stays, as in Build and Deploy Your First API. Even there, a provider can help: Application flows gives a background service its own token.
The costs are real. The provider is a new dependency: if it is down, nobody can sign in. You must configure it with care, because a wrong redirect address or audience is a security bug. A hosted provider can cost money for each user. And the practice provider is for learning only: it has no passwords, and it keeps its codes in memory.
Your turn: ask for a scope that does not exist
Section titled “Your turn: ask for a scope that does not exist”Change one thing in the address of step 7. Predict first: what does the provider answer if the application asks for tickets:delete too? Change the scope part to scope=openid%20tickets%3Aread%20tickets%3Adelete, and open the address.
Show the answer
The provider shows no sign-in page. It answers with an error:
{"error":"invalid_scope","error_description":"Scopes not allowed for this application: tickets:delete"}The provider knows which scopes each registered application may ask for. ticket-cli may ask for the three ticket API scopes, and tickets:delete is not one of them. So an application cannot give itself more power by asking for it, and the person never sees a page that offers it.
Common mistake
A second provider, or another program, on port 8400
Symptom: python -m idp prints its first line and stops at once:
Practice identity provider: http://localhost:8400 (made-up people, no passwords)ERROR: [Errno 48] error while attempting to bind on address ('127.0.0.1', 8400): address already in useThe number is 48 on macOS. Linux and Windows show other numbers for the same error.
Cause: another program already listens on port 8400. Often it is the provider itself, still running in a terminal that you forgot.
Diagnose: find the program that has the port. On macOS and Linux: lsof -i :8400. On Windows: Get-NetTCPConnection -LocalPort 8400 shows the process ID in OwningProcess.
Fix:
- If it is your own provider, use that one, or stop it with Ctrl+C in its terminal.
- If another program needs the port, move the provider: set
IDP_PORT=8401andIDP_ISSUER=http://localhost:8401in.env. - Also add
OIDC_ISSUER=http://localhost:8401to.env.scripts.login, in the next lesson, finds the provider by this setting, and the API does too, from Token meaning. The issuer is the provider’s name in every token, and the API refuses tokens with another name.
A similar first-run error: The provider has no keys yet. Run: python -m idp init. Run init in the project folder, then start the provider again.
Check your understanding
Sam signs in to the help-desk page. Which token tells the help-desk application who signed in, and which token does the application send to ticket-api? Why not one token for both?
Show the answer
The ID token tells the application who signed in; it is part of OpenID Connect. The application sends the access token to ticket-api; it is part of OAuth. One token for both would have two readers. A token’s audience names its one reader, so the API can refuse a token that was made for someone else. That stops a token for another API, or an ID token, from opening this API.
Does your answer have the main points of ours?
Sign in and enroll in the course to save your answers. Every check counts toward the certificate.
Check your understanding
Tomás says: 'OAuth is a sign-in standard, so the access token tells the application who the person is.' What is wrong?
Show the answer
OAuth is about access: the access token says what an application may do at one API. It is written for the API, and the application should not read it. Sign-in is OpenID Connect, a layer on top of OAuth: the scope openid asks for an ID token, which is written for the application and says who signed in.
Does your answer have the main points of ours?
Sign in and enroll in the course to save your answers. Every check counts toward the certificate.
Check your understanding
Why does the course's access token carry no organization and no role, although Camille has a role in two shops?
Show the answer
Because a role belongs to a membership, not to a person. Camille is staff at Larkfield and read-only at Bramble Books. A token that said “staff” would give them staff rights at Bramble Books too. The provider also does not know the shops’ members. So the API takes the organization from the request path and the role from its own membership table, on every request.
Does your answer have the main points of ours?
Sign in and enroll in the course to save your answers. Every check counts toward the certificate.
Recap
- An identity provider checks who a person is and issues tokens. The API never sees a password.
- OAuth 2.0 gives an application a limited access token for one API: the key card. Its audience names the API; its scopes name the allowed actions.
- OpenID Connect adds sign-in: the scope
openidasks for an ID token, which tells the application who signed in. - The discovery document at
/.well-known/openid-configurationlists the issuer, the sign-in page, the token endpoint and the keys. - The practice provider runs with
python -m idp initandpython -m idponhttp://localhost:8400. The token carries no organization and no role: the API reads them from its own tables. - Next: sign in step by step, and see why the code in the browser’s address is useless to a thief.
Next: Application flows